Posted September 1, 2025 by Martin
How to build virtual reality experiences that don’t make the user want to take off their headset
I’d like to start with one of the biggest “Ah-ha!” moments in my game development journey.
In January of 2012, my then-fiancée-now-wife and I were on a ferry from Rossaveel to Inis Mór, an island off the coast of Ireland. The sea was angry that day, my friends; angry like an Apple customer trying to get a straight answer at the Genius Bar. The boat kept rocking back and forth with each wave, and below deck, Nicole was starting to turn green. When she asked me why I wasn’t turning a leafy shade of nauseated as well, I told her something I’d learned a long time ago: keep your eyes on a fixed point on the horizon to manage the seasickness.

She was understandably skeptical, but moments later, her nausea disappeared. We made it through choppy waters just fine and had a lovely time. That moment on the ferry, however, stuck with me. When we returned stateside, I started to experiment, and soon enough my suspicions were confirmed.
I had found a way to mitigate VR vertigo almost entirely.
According to the National Ocean Service, seasickness is caused by a conflict between two sensory inputs: vision, and balance.
Humans detect the body’s motion both via sight and via the balance sensorium in the inner ear. Your eyes tell you you’re moving, your inner ear confirms any changes in acceleration and orientation, and your brain uses this information to update its own understanding your body’s current state. On a ship at sea, especially below deck, your ear tells you “We’re moving” while your eyes tell you “We’re standing still.” In trying to resolve that conflict, the brain starts throwing error messages (and you might, up).
Keeping your eyes on the horizon resets that mismatch, giving your brain time to synchronize what your eyes are seeing with what your ears are feeling.
In VR, the situation is reversed: your eyes are telling you you’re moving, while your ears are telling you you’re stationary. VR roller coasters are especially notorious for causing nausea in a lot of users, in some cases lasting for days. For some players, it doesn’t even take an immersive VR experience to trigger the nausea; a typical first-person shooter is enough to make them reach for the Dramamine.
This problem has hounded VR development since forever. The hardware has gotten a lot better, the experiences today are significantly richer and more immersive, and companies are investing serious chunks of cash into the medium, but it’s a commonly known fact that the vast majority of VR headsets end up collecting dust because many people get nauseated after prolonged VR use. Some fortunate folks adapt and don’t experience VR sickness, but the issue is widespread enough to be holding back the medium as a whole.
Luckily, there’s a solution.
Going back to that fateful ferry ride, my idea was to give the user a fixed point to look at in third-person perspective which would serve as an “anchor point” to keep their eyes and ears from going out of sync. This idea flies in the face of 99% of VR experiences out there, which are almost always designed to use a first-person perspective.
In first-person, you view the world through the eyes of whatever character you play as. Some games give you hands, or claws, or controllers, and the motion of your head is translated into the motion of your character’s head. So far, so good, but when that character moves, either by teleporting from one point to another or by smoothly transitioning from point A to point B, your eyes and ears begin to argue with each other. If those arguments happen often enough, the user gets VR-sick.
In a third-person game, you see the character you control moving around the game world. But even in those games, once again there’s a risk of infighting between your senses because the movements of your physical head and the virtual camera you’re inhabiting don’t match. VR motion induces motion sickness even in third-person because your eyes may become convinced your body is moving while your ears are certain you’re standing still.
The solution is to trick your eyes into seeing your character as stationary even when they’re moving. Here’s how.
Let’s set up a VR project in Godot. I’m not going to walk you through the whole setup process here; there are plenty of excellent video tutorials for that.
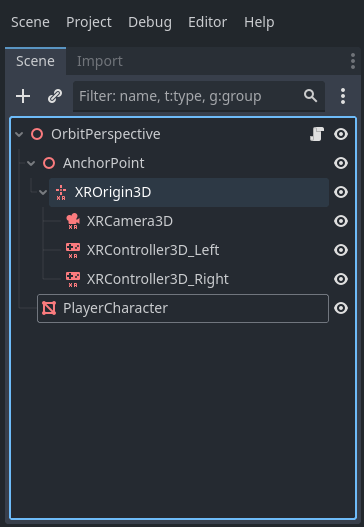
Once you have a VR project ready, create a new 3d scene with a Node3D at its root. We’ll save this scene as orbit_perspective.tscn. Next we do the usual VR setup of adding an XROrigin3D node, with an XRCamera3D and two XRController3D child nodes. (Make sure to select the correct tracker – left hand or right hand – for the controllers.)
At this point, we add our Anchor Point to the scene; this is the point the camera will be orbiting. Add a Node3D child node to the scene root, then move the XROrigin3D and its children into the Anchor point node.
Next, we’ll add a player character. I’m going to add an old Destiny character model I had lying around, but feel free to add whatever you like; the important thing to note is that this is where your player character would go.
That’s the scene setup. Now let’s start scripting.
(NOTE: I’ll be writing this script in C#, but I’ll do my best to explain every step, so once you understand the basic approach you should be able to port this to GDScript if you’re so inclined.)
Attach a script to the scene’s root node. The script will need to work with the main camera and the XR origin, so we add these as variables with the [Export] directive so we can assign them via the Godot editor.
using Godot;

public partial class OrbitPerspective : Node3D
{
    [Export]
    private XROrigin3D PlayerXrOrigin;
    [Export]
    private XRCamera3D MainXrCamera;
}
Next, we’ll want to add a variable that defines the max zoom distance, i.e. the maximum distance the camera will be at from the player character. We’d like this to be adjustable via the editor as well, but we’ll define a default value of 30 units (one standard Godot unit is about 1 meter in VR).
    [Export]
    private float MaxZoomDistance = 30.0f;
We need one final variable; this one will define how quickly our camera will orbit around the anchor point. Like the zoom distance, we want this to be editable, and we’ll provide a default value.
    [Export]
    private float CameraOrbitSpeed = 10.0f;
We’ll do some basic error checking in the _Ready() function to print an error if we forget to assign either an XROrigin3D or an XRCamera3D.
    public override void _Ready()
    {
        if (PlayerXrOrigin == null) GD.PrintErr($"PlayerXrOrigin not assigned; please assign an XROrigin3D in the editor.");
        if (MainXrCamera == null) GD.PrintErr($"MainXrCamera not assigned; please assign an XRCamera3D in the editor.");
        base._Ready();
    }
Now it’s time to code the actual orbiting behavior. Each frame, we take the current global orientation of the main camera and multiply it with our max zoom length, which gives us a “camera boom” vector. We then slerp (spherical linear interpolation) between the XROrigin’s current local position and the camera boom, using the camera orbit speed as the slerp factor.
    public override void _Process(double delta)
    {
        Vector3 CameraBoomVector = MainXrCamera.GlobalBasis * Vector3.Back * MaxZoomDistance;
        PlayerXrOrigin.Position = PlayerXrOrigin.Position.Slerp(CameraBoomVector, CameraOrbitSpeed * (float)delta);
    }
Since we want this calculation to happen every frame, we use the _Process(double delta) function.
To calculate the camera’s orientation, we multiply its global basis with Vector3.Back; multiplying a basis with a vector rotates that vector along that basis, so by doing this we’re adjusting the vector (0, 0, 1) into the camera’s global orientation. Finally, we multiply that vector with MaxZoomDistance to calculate our virtual camera boom.
Next, we update PlayerXrOrigin’s local position by slerping between the camera boom vector and the origin’s current local position, multiplying by CameraOrbitSpeed and the frame delta.
Here’s what the end result looks like:
And here’s this kind of perspective in action in a VR prototype I’m working on right now:
For completeness’ sake, here’s the full script:
using Godot;

public partial class OrbitPerspective : Node3D
{
    [Export]
    private XROrigin3D PlayerXrOrigin;
    [Export]
    private XRCamera3D MainXrCamera;

    [Export]
    private float MaxZoomDistance = 30.0f;
    [Export]
    private float CameraOrbitSpeed = 10.0f;

    public override void _Ready()
    {
        if (PlayerXrOrigin == null) GD.PrintErr($"PlayerXrOrigin not assigned; please assign an XROrigin3D in the editor.");
        if (MainXrCamera == null) GD.PrintErr($"MainXrCamera not assigned; please assign an XRCamera3D in the editor.");
        base._Ready();
    }

    public override void _Process(double delta)
    {
        Vector3 CameraBoomVector = MainXrCamera.GlobalBasis * Vector3.Back * MaxZoomDistance;
        PlayerXrOrigin.Position = PlayerXrOrigin.Position.Slerp(CameraBoomVector, CameraOrbitSpeed * (float)delta);
        base._Process(delta);
    }

}The key ingredient here is that motion happens anytime you move your head, and the brain cleanly maps that orbital motion reported by your eyes to the acceleration registered by your ears. The camera orbit speed is important; if you want to experience vicious nausea, try setting the orbit speed to a very low value. (Don’t say I didn’t warn you!)
At this point, there are a couple of things you can do to tweak the script and adapt it to whatever use case you have. One of the first things to do would be to make the length of the camera boom adjustable.
Giving the player the ability to adjust the length of the camera boom is a good idea. Also, if you make the boom adjustable, you can then use a RayCast3D to detect if the camera is clipping through geometry and dynamically adjust the boom length to prevent clipping, just like you would in a traditional, non-VR third-person action game.
And that’s it! Give this technique a whirl and see how it works for your game.
Until next time!