
Posted August 8, 2025 by Martin
Bringing the beloved scifi franchise to the virtual tabletop
It took me about 15 minutes of watching The Expanse to be hopelessly hooked on this scrappy little show about space, mankind’s place therein, and how human nature will shape our future among the stars.
I’ve been playing roleplaying games for as long as I can remember. One day, I saw a hardcopy of the TTRPG for The Expanse on a shelf at Barnes & Noble, and that was one of the easiest purchase decisions of my life. One of my favorite scifi settings and my favorite hobby combined? Oh nooo, you’ve got chocolate all over my peanut butter!
Then, the COVID-19 pandemic hit, and it changed everything.
My regular Wednesday night TTRPG group had been going strong for almost a decade in 2020, but with the pandemic, we found ourselves unable to sit down at the table together. We, like many others, eventually made the switch to the virtual tabletop (VTT), and that opened up a whole new world of possibilities. I’m not going to make a value judgment on which way to play is better, but there are certain aspects of the VTT that I like. My least favorite part of playing TTRPGs is the dice herding, having to calculate roll totals, keeping track of target numbers, success thresholds, miscellaneous modifiers, and all the math that bogs down play. Don’t get me wrong: I love math. Math is important for making games fun. But sometimes I just want to know if I’ve successfully shoved a torpedo up a pirate’s drive cone without first having to do a minute of math to get there.
So when it came time to take that sourcebook for The Expanse and translate it into a VTT experience, that was my primary objective: Build a system that is fast, transparent, easy, and resilient. I think I’ve succeeded, but ultimately you’ll be the judge of that.
In this guide, you’ll find instructions on how to download, set up, and play my version of The Expanse on Roll20. I’ve spent about a year putting this together, and I hope you’ll get as much fun out of this project as I have. And if there’s anything you’d like to change, have at it! I’ve taken this as far as I can (for now), but there’s always more work that can be done to make things better. I’m curious to see what, if anything, people will do with this.
I need to give a shoutout to my playtesters and TTRPG friends. They are genuine heroes for putting up with my janky homebrew Frankencode implementation, and I am immensely grateful for their honest, priceless feedback. They’re the reason this project exists at all.
Lastly, I couldn’t have done this without my amazing wife Nicole. You urged me to set up this TTRPG group all these years ago, and you’ve supported my mega-nerdy hobby all the way through. I love you to bits, and I owe you everything, setara mi.
Alright then, let’s get started.
I used generative A.I. to create some of the visual assets for this project. None of the Javascript, HTML, or CSS was created using A.I. tools.
Here’s what you’ll need to play The Expanse on Roll20:
First, visit the download page and grab the package. Here’s what’s inside each folder:
Once you’ve downloaded and extracted everything, create a new game on Roll20 and start plugging everything in.
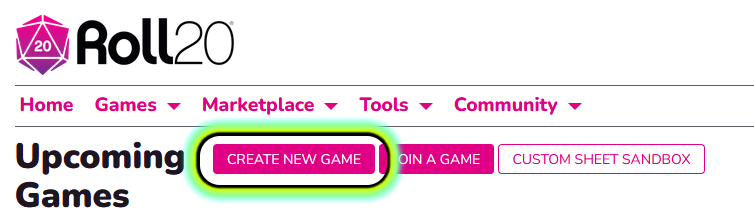
Log into Roll20, then create a new game.
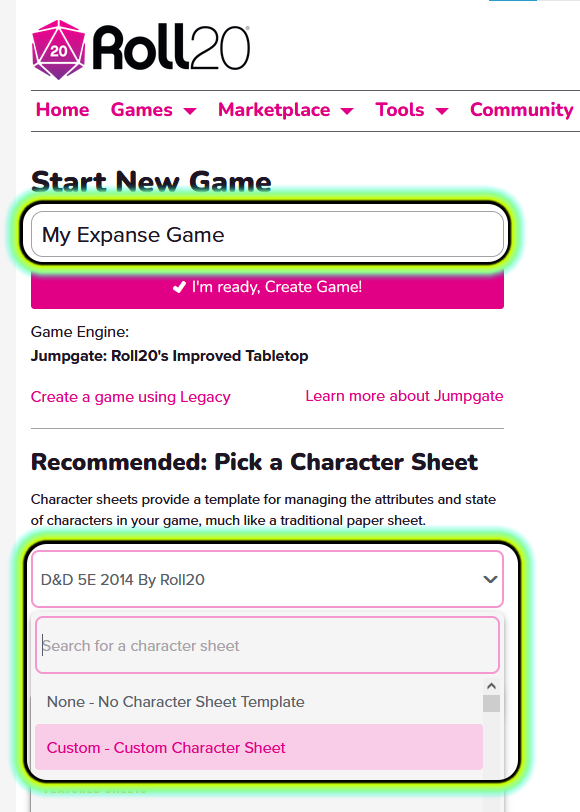
Give your game a name and select “Custom” from the Character Sheet dropdown. Finally, click “I’m ready, Create Game!”
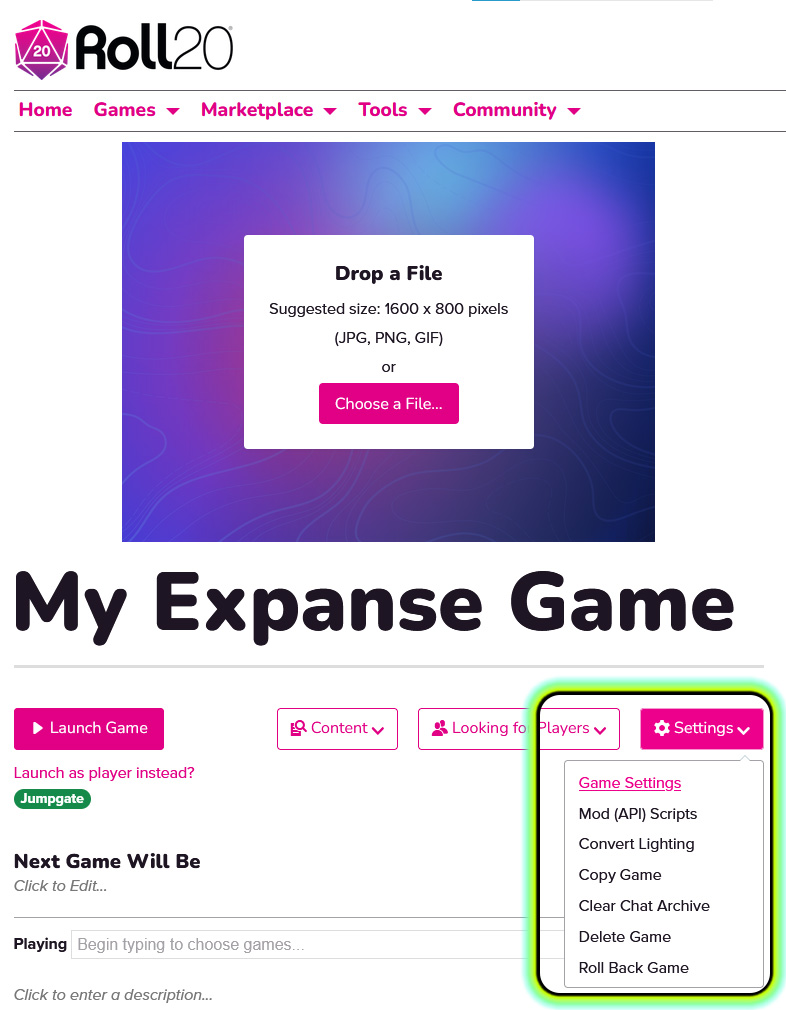
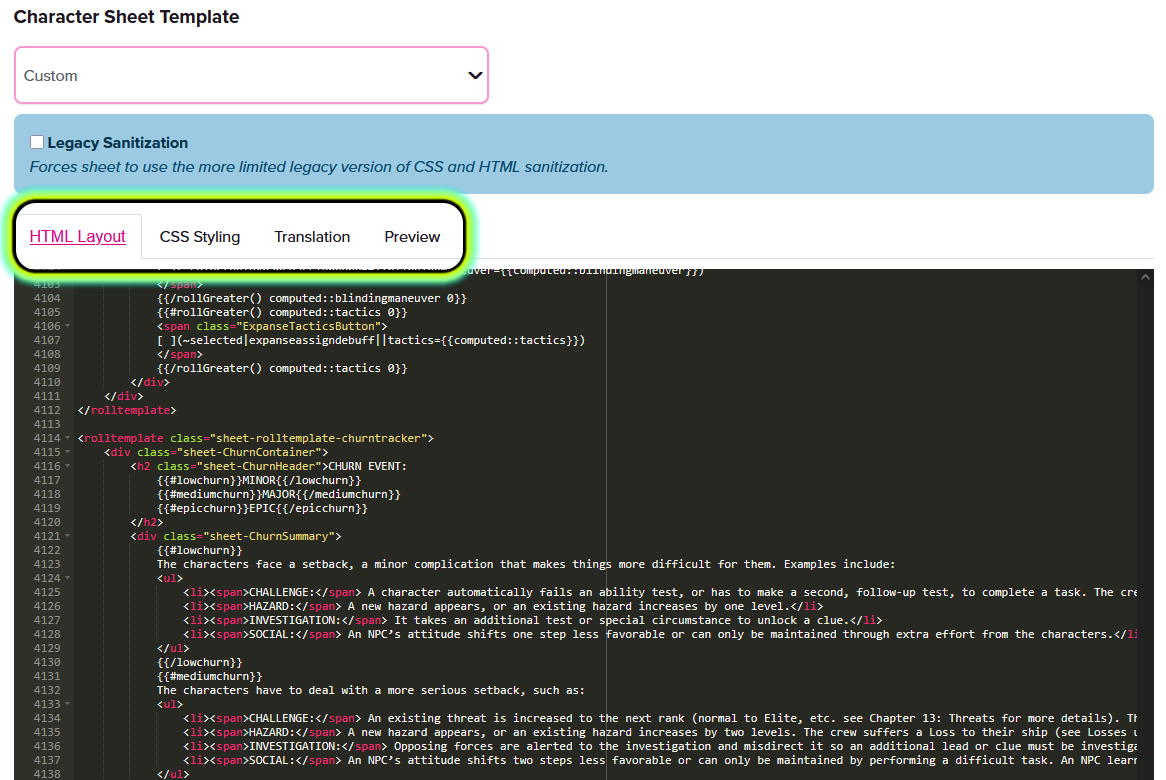
In your new game, open Settings, then Game Settings. Adjust settings to your liking, then scroll down to the Character Sheet Template.
Paste the HTML source from CharSheet-HTML.html into the HTML Layout tab, then switch to the CSS Styling tab and paste the CSS source from CharSheet-CSS.css into it. Finally, scroll all the way down and click “Save Changes.”
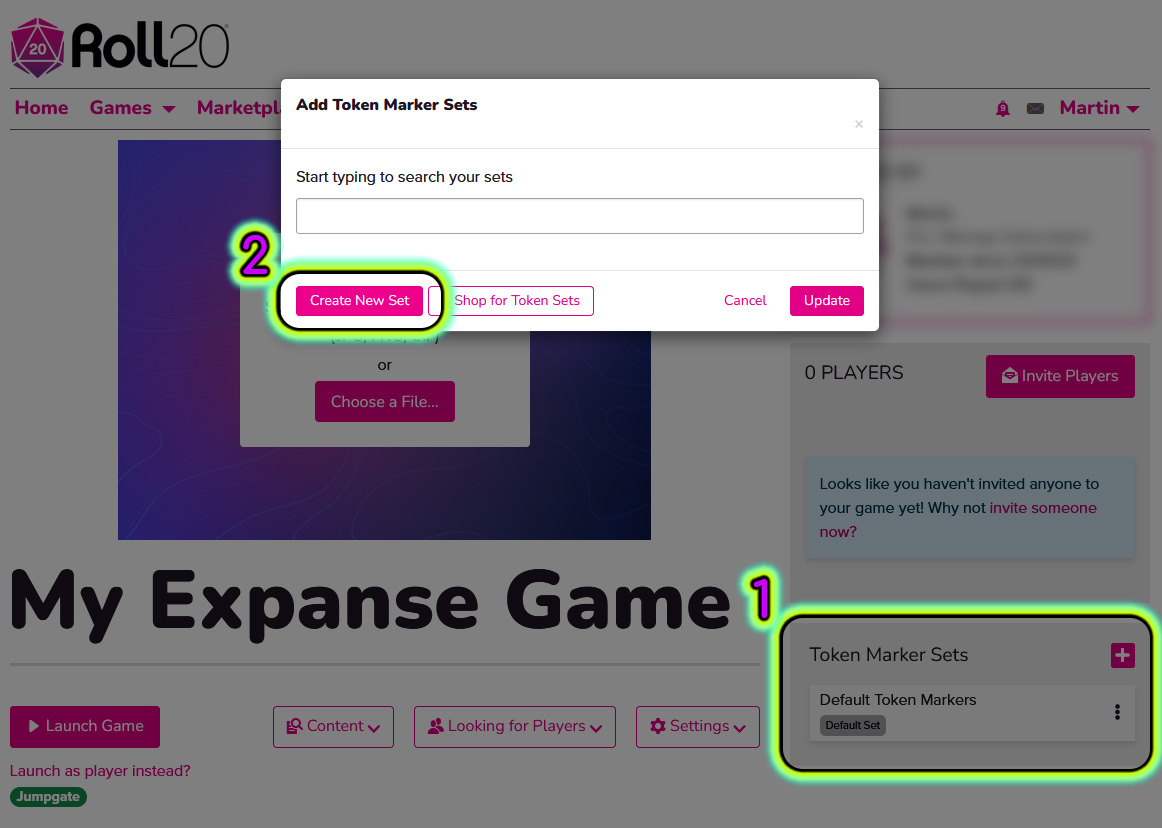
Back on your new game’s main page, click the + next to Token Marker Sets, then Create New Set.
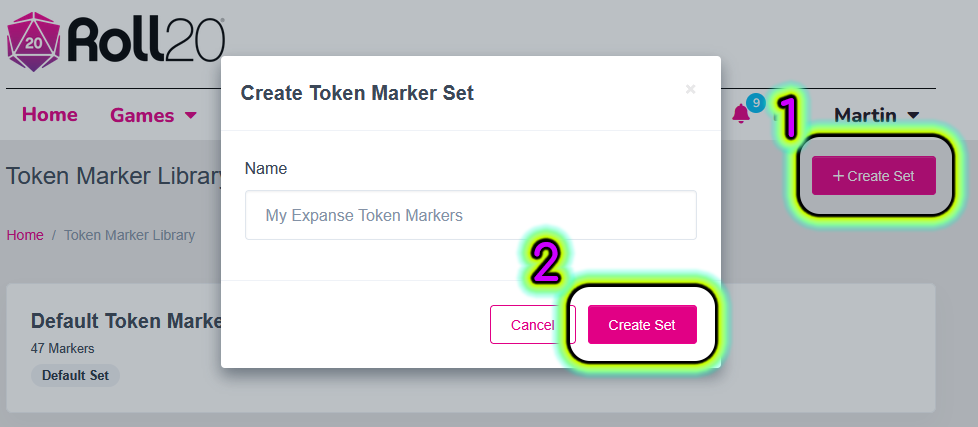
In the Token Marker Library, click Create Set. Name your set, for example Expanse Custom Markers.
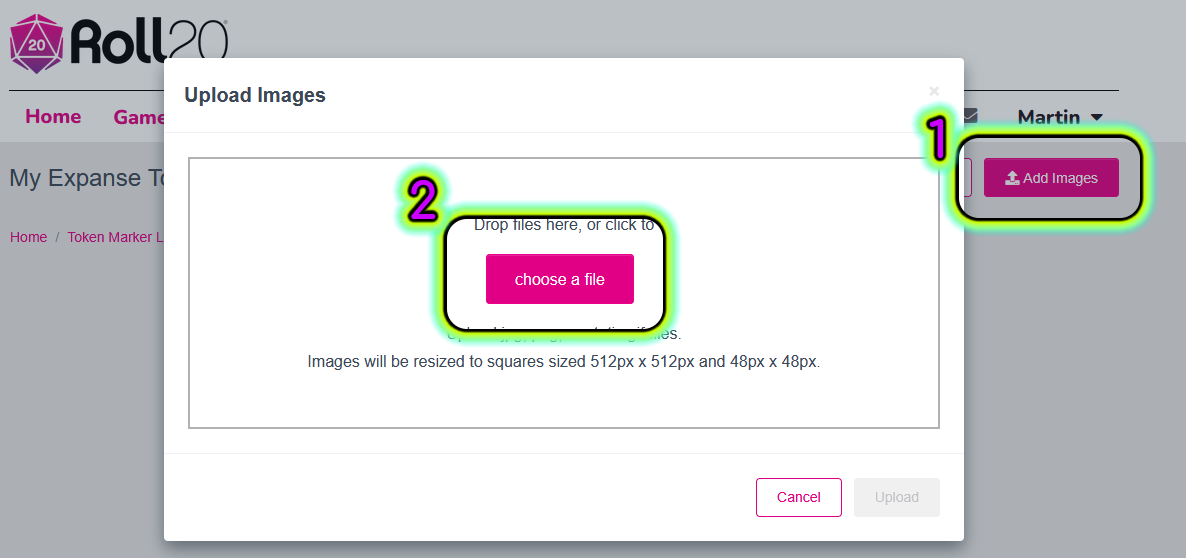
Click Add Images, then either drop the custom markers in the modal or click choose file and navigate to the markers folder.
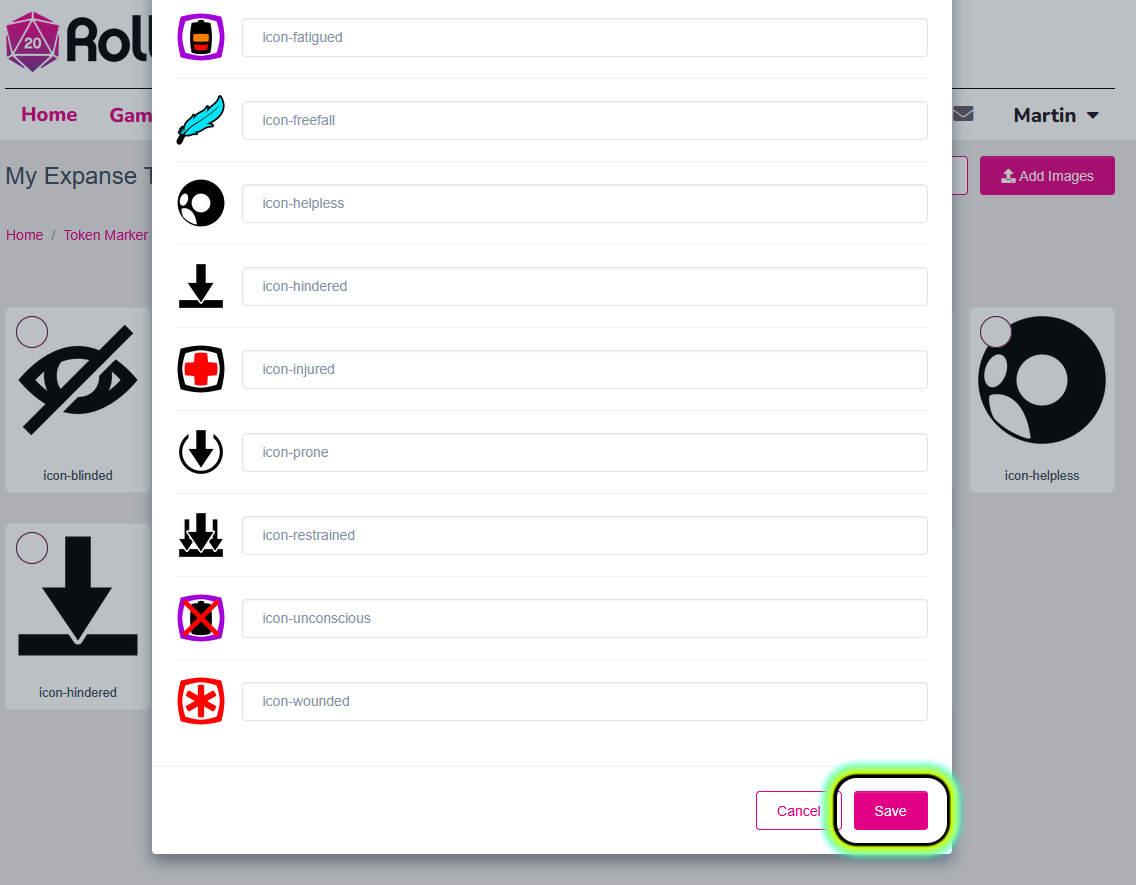
On the next screen, LEAVE THE MARKER NAMES as they are. Click Save.
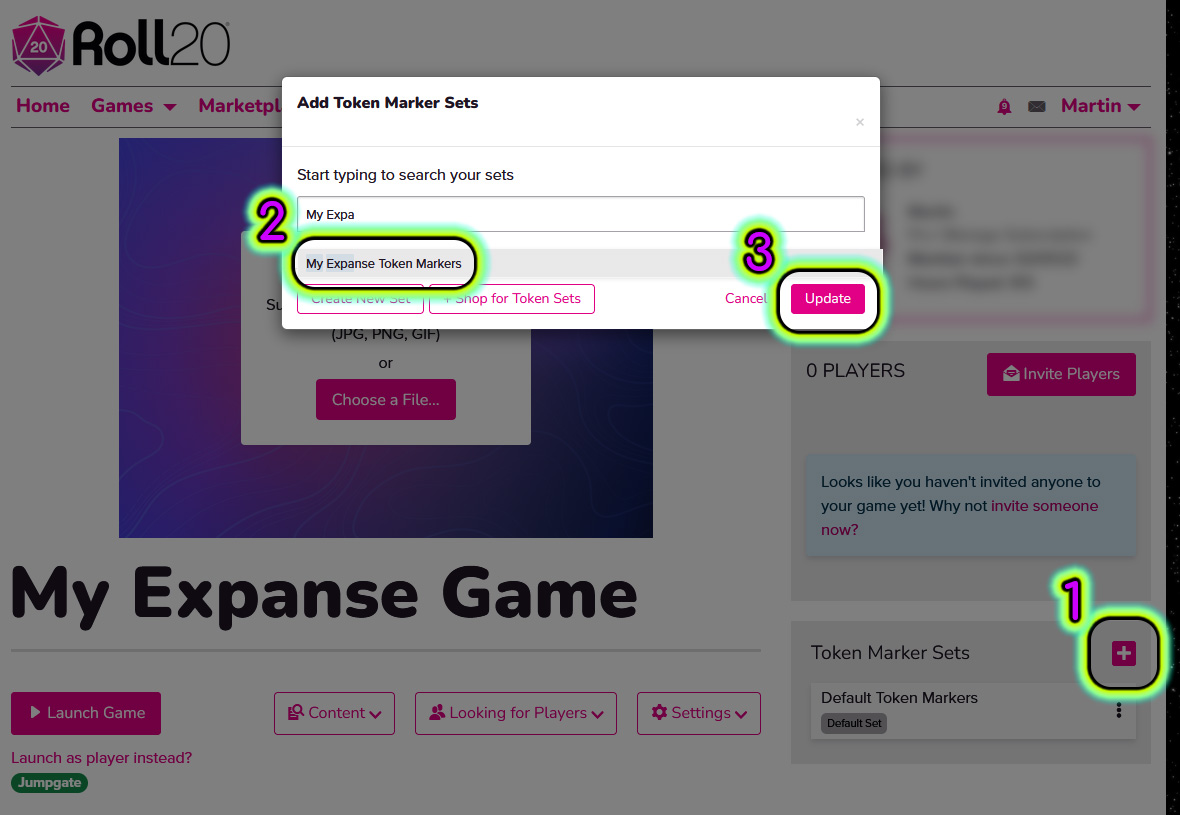
On your game’s main page, click +, then type in the name of your new set, then add it and click Update.
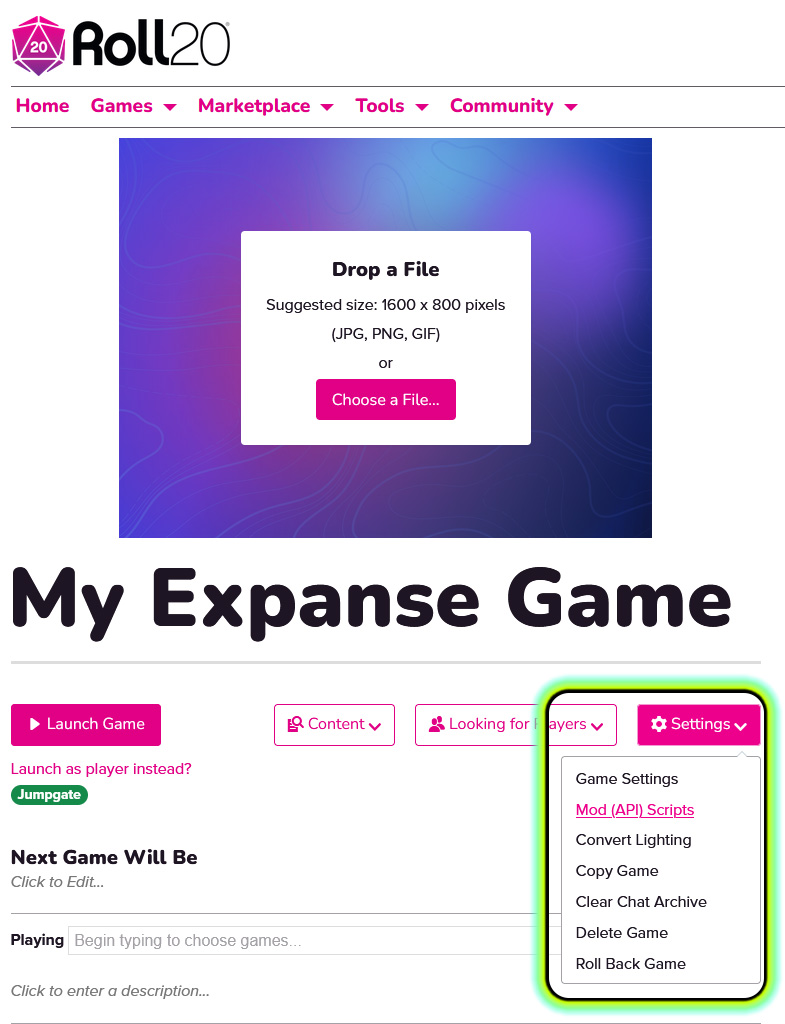
In your game’s Settings, click Mod (API) Scripts.
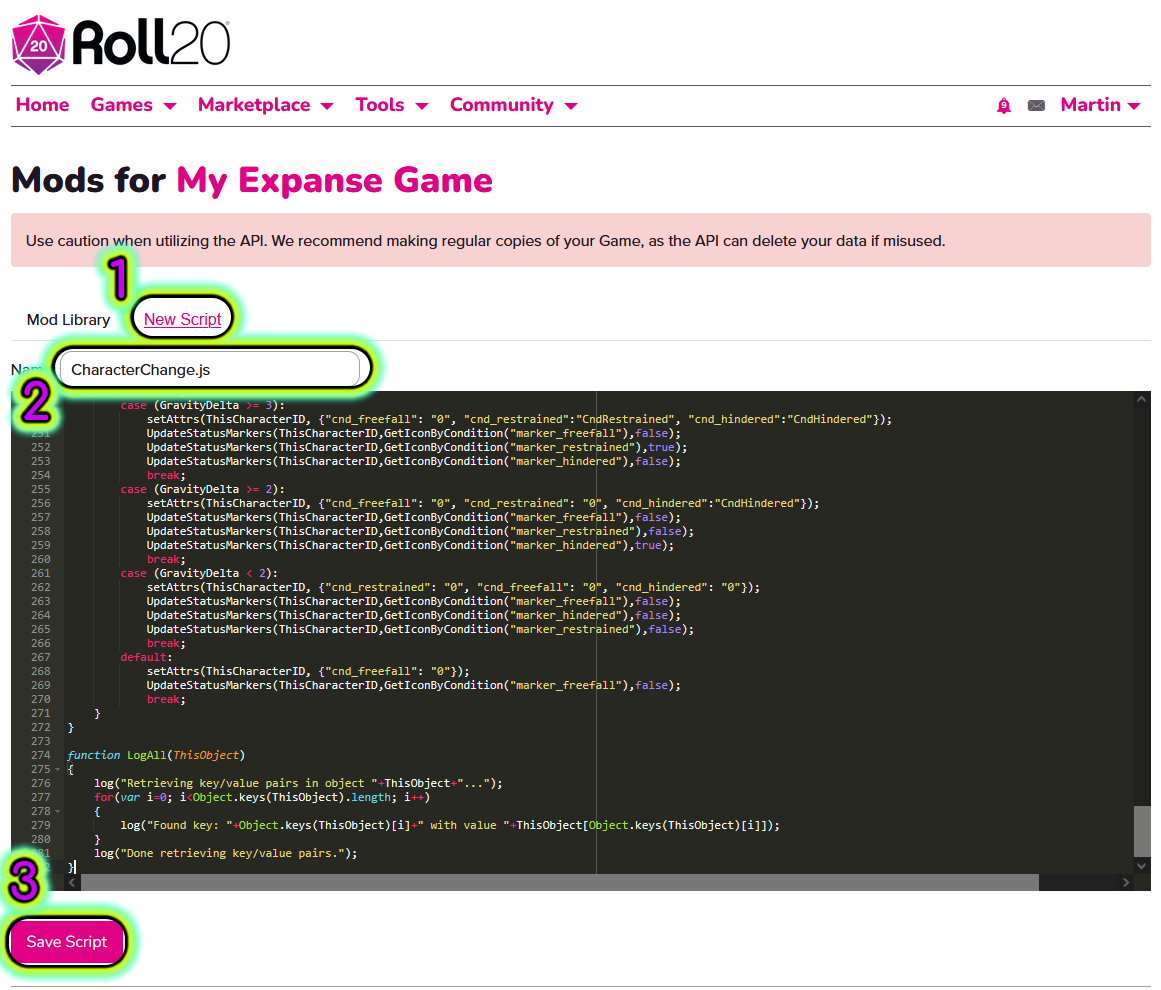
In your Mod Library, click New Script. Name the new script CharacterChange.js, then paste the source code from the CharacterChange.js file into your new API script. Click Save Script. Repeat these steps for ShipCombatHelper.js and ChurnTracker.js.
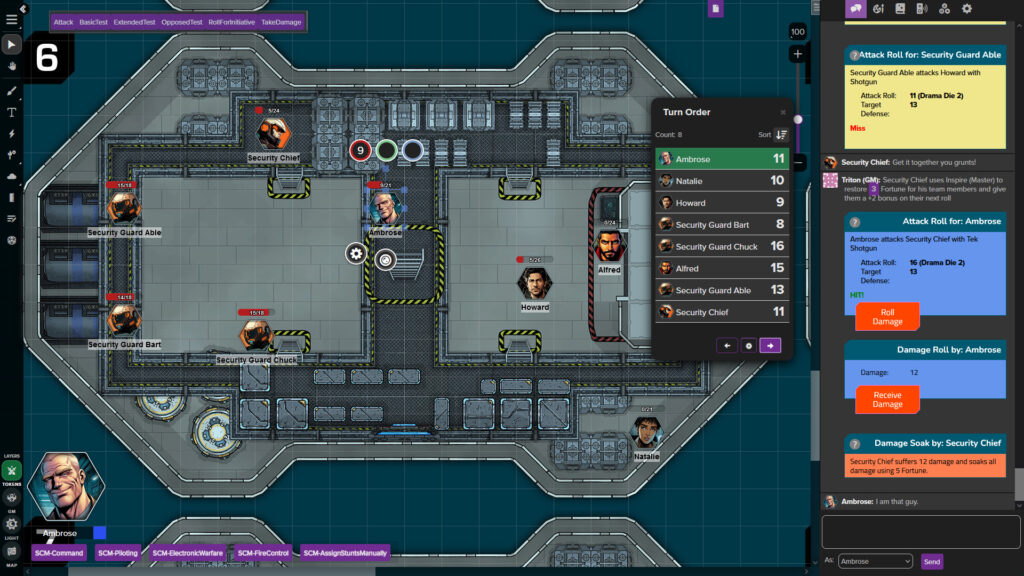
Phew! You should now have the custom character sheet and related API scripts all hooked up and ready. It’s time to launch your game and set up the macros and token actions you will be using to play the game. First, we’ll add the Player macros, then the Ship Combat macros, and finally the GM macros.
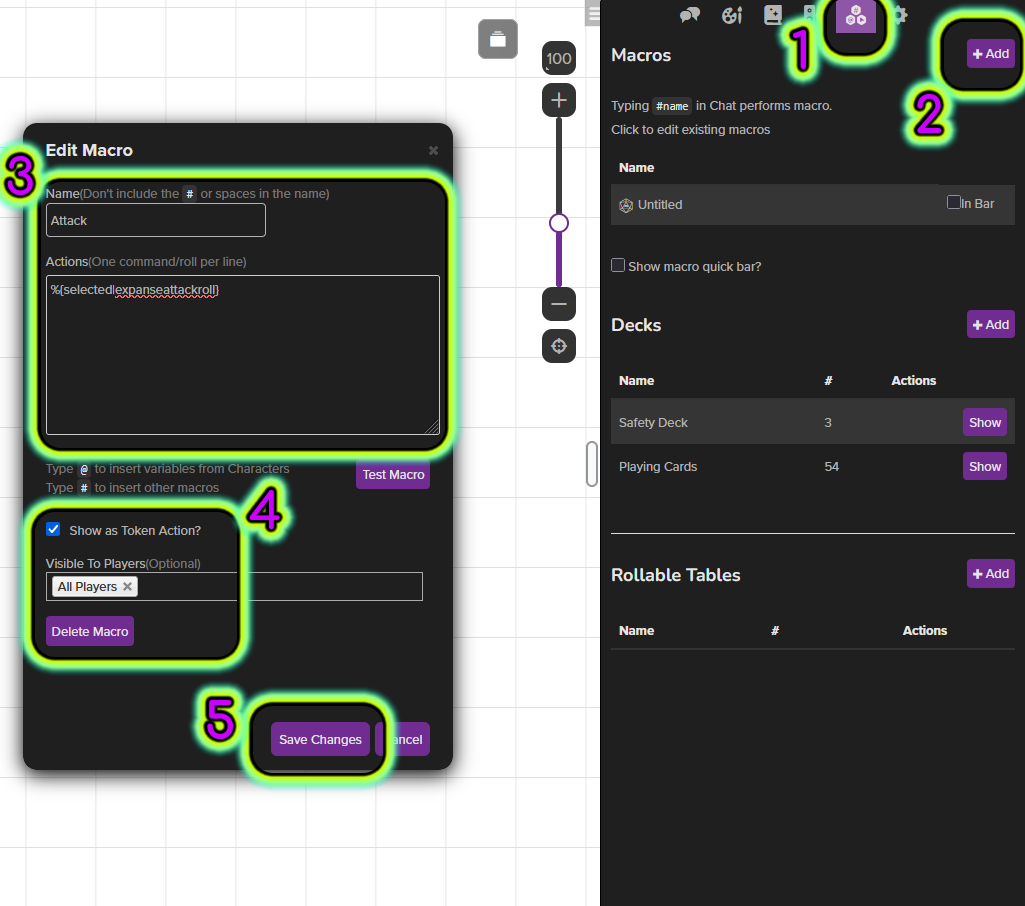
Launch your newly created game, then click the Collection tab. In the Macros section, click “+Add” to enter new macros. Each macro will need a Name and an Action; see table 1 below. For each new macro, scroll down to the bottom of the dialog pop-up and make sure “Show as Token Action?” is checked and “Visible To Players” is set to “All Players.”
Note: Do not add whitespaces to macro names. Enter them exactly as below;
whitespace causes Roll20 to go haywire.
| Macro Name | Action |
| Attack | %{selected|expanseattackroll} |
| BasicTest | %{selected|expansebasicroll} |
| ExtendedTest | %{selected|expanseextendedtest} |
| OpposedTest | %{selected|expanseopposedtest} |
| TakeDamage | %{selected|expansetakedamage} |
| RollForInitiative | %{selected|expanseinitiative} |
Follow the steps above to add the following Ship Combat macros. These should be flagged as Visible To Players, but not as Token Actions. Instead, each player should mark these as In Bar in the macros list.
| Macro Name | Action |
| SCM-Command | %{selected|expanseshipcommandtest} |
| SCM-Piloting | %{selected|expansepilotingtest} |
| SCM-ElectronicWarfare | %{selected|expanseshipewtest} |
| SCM-FireControl | %{selected|expanseshipfirecontrol} |
| SCM-AssignStuntsManually | %{selected|expanseassigncommandstuntsmanually} |
Follow the steps above to add the following GM macros. These let you increase, decrease, reset, and query the Churn. Do not make these visible to players, and do not show these as Token Actions, but do flag them as visible in your macro bar.
| Name | Action |
| RaiseChurn | !raisechurn |
| LowerChurn | !lowerchurn |
| CurrentChurn | !getchurn |
| ResetChurn | !resetchurn |
That’s it! Now that everything is hooked up, let’s have a look at how to actually play this game.
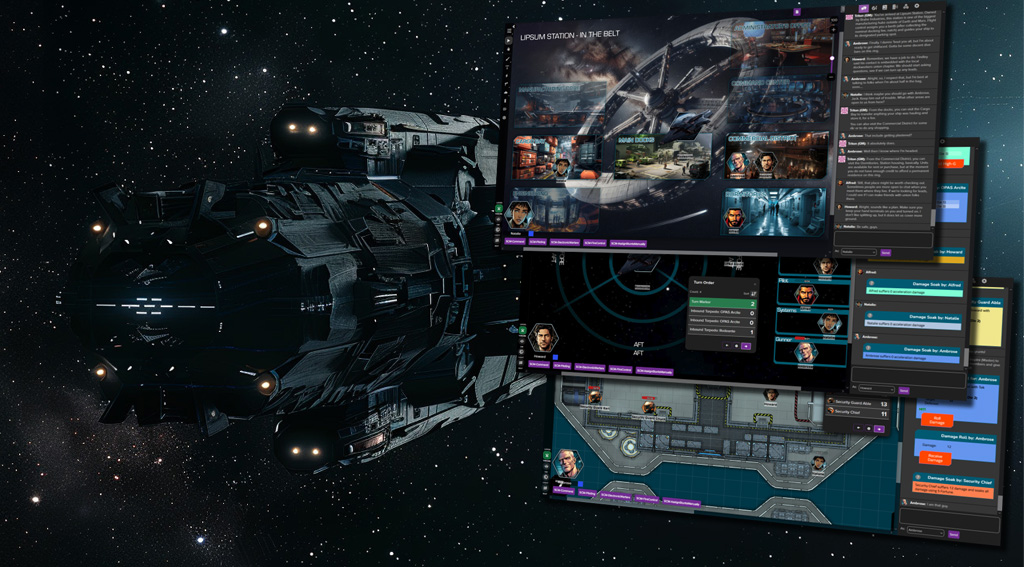
The way to play The Expanse is centered on Tokens. Players will have their character Tokens on the virtual tabletop and can access their abilities via the Token actions we just set up in part 4. Using abilities will add messages in the game chat, with buttons that other characters can use to respond to or continue certain actions.
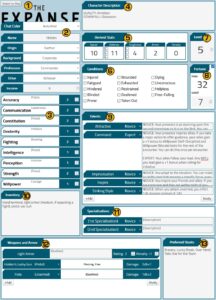
That’s the high-level overview, and we’ll go into more detail in later sections. First, let’s review the character sheet. Create a character in the Journal, then click their name to open their sheet.
The character sheet breaks down into the following sections:
There is also a Ship Sheet; if you click the “Switch to Ship” button at the top of the character sheet, you can toggle between a character and a ship sheet. We’ll discuss the Ship Sheet in the Space Combat chapter.
Since Tokens are central to playing The Expanse, let’s go into how to set up your Tokens for play.
Click a character in the Journal, then click the “Edit” button at the top right. Now you can add images for that character’s Avatar and their Default Token, and you should do that. There are some sample Token images in my assets folder to get you started, or you can source your own.
Once you’ve added those images, click the “Edit Token Properties” button. These are the recommended settings:
Once that’s all done, click “Save Settings” and drag the character from the Journal to the virtual tabletop to make sure everything looks right: The nameplate is there, and there’s a bar showing their currently used Fortune which updates as the character uses and regains points. Now, let’s roll some dice!
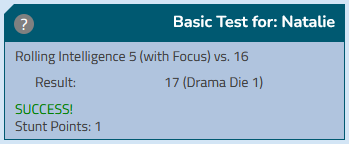
Here’s how to make a Basic Test:
Once the test is complete, you’ll see a summary in chat. If you hover over the result number, you’ll see the actual dice rolled. You can also hover over the “?” to see a summary of all the factors that went into the test. If the test generated Stunt Points, you’ll see those called out as well.
Gameplay example: Howard wants to force open a stuck door. The GM tells Howard that this will be a Strength (Might) 14 test, and since he has a crowbar on hand he gets a +1 for this test. Howard clicks his Token, clicks BasicTest, enters 14 as the target number, selects Strength, selects “No” for the Focus (he doesn’t have the Might focus), but he does add a 1 under Other Modifiers.
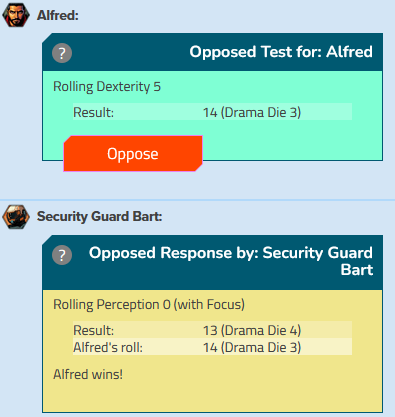
Opposed Tests work similar to Basic Tests, except another character can respond to the test via chat. Here’s how that works.
To make an Opposed Test:
Like before, this outputs a summary in chat. However, this summary also features an “Oppose” button, which another character can use to oppose the test as follows:
Now, you’ll see a full summary in chat announcing the winner (or a draw if there’s no winner).
Gameplay example: Alfred is trying to sneak past an OPA lookout. He clicks his Token, clicks OpposedTest, selects Dexterity, selects “Yes” for the Focus (Alfred has Stealth as a Focus), and the GM informs Alfred that he’ll have a -1 modifier for this test because this is a well-lit area, so Alfred enters -1 under Other Modifiers. Now, the GM selects the OPA Lookout token, clicks the “Oppose” button in chat, selects Perception as the Ability, “Yes” for the focus (the Lookout has Seeing as a Focus, which the GM determines is appropriate here), and leaves Other Modifiers as 0.
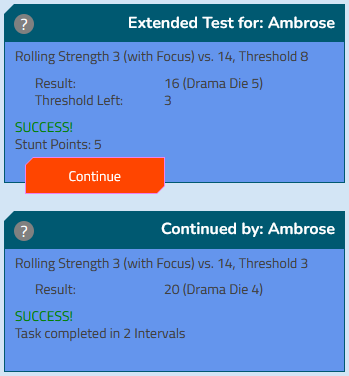
Advanced Tests also use chat buttons to continue a test over several rolls. This is how to make an Advanced Test:
This drops a summary of the Advanced Test start in chat. You can now use the “Continue” button to continue the test. Keep hitting “Continue” until the threshold is reduced to zero and the test concludes.
Sooner or later, it’ll be time to ROLL FOR INITIATIVE! When that happens:
This will automatically add characters to the Turn Order.
As a GM, you can track Churn using a couple of macros. Churn is not tracked automatically, so it’s up to you to pay attention to when you need to advance the counter. Please refer to the game’s rulebook for when you need to increase Churn.
In the In-Game Setup chapter, you added some GM Churn tracker macros. These are:
At 10 Churn, there’s a 50% chance of a Minor Churn Event; if an event is triggered, details will appear in chat. At 20, there’s either a Minor or a Major Churn Event, and at 30 there’s either a Major or an Epic Churn Event, then the Churn resets to 0.
Combat uses a lot of the same conventions as the fundamental tests, with a couple of adjustments.
The basic attack sequence is as follows:
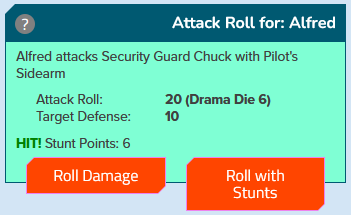
To make an Attack roll:
Now, you’ll see a summary of the attack in chat. If the attack succeeds, the attacker can roll for damage using the button in chat. If the attack generated Stunt Points, there will also be an option to roll using damage-related stunts.
To roll damage:
This generates a roll summary for the damage roll, complete with a button the target can use to receive the damage as follows:
The final outcome of the attack now appears in chat, and any resulting status changes are automatically applied to the targeted character.
There may be times when a character needs to manually try to resist damage, for example
if there’s an environmental hazard or another out-of-combat source of damage. In that case, use the TakeDamage Token Action:
This also generates a summary in chat and automatically applies conditions to the character.
If an attack generates Stunt Points, the attacker has the option to roll damage using damage stunts. The stunts a character can apply directly via “Roll with Stunts” are: Overcome Toughness, Ricochet, Vicious Blow, Lethal Blow, Called Shot, and Adrenaline Rush. These are General Combat Stunts that directly affect damage, but there are many more stunts available in the rules. If a player wants to use other, non-damage stunts, they can declare them before rolling damage.
After playtesting space combat, I’ve adjusted the rules to make things more interesting and deadly, and to add a couple more tactical considerations to ship-to-ship battles.
Having played with these rule adjustments a fair bit, I can say from personal experience that they make space combat more intense and fun, but ultimately it’s your game. If you want to go in and change things, you can. You are the best judge of what is and isn’t fun for you and your friends.
With that out of the way, let’s do a brief overview of the ship sheet and space combat.
In a nutshell, ships in The Expanse are characters. Depending on what kind of campaign you’re running the players will have their own ship, but all other ships they encounter will be special characters the GM designates as ships.
To create a ship NPC, make a new character in the Journal as usual, then open the character sheet and fill out their Abilities. To keep things simple, you can set NPC ship Ability scores to the crew’s Competence Rating, and also make sure to adjust the character’s level to increase their Fortune to be appropriately challenging for your players. Next, click “Switch to Ship” at the top, and start filling out the ship stats.
The ship sheet includes the following sections:
Familiarize yourself by creating a ship or two, using the same recommended Token settings as discussed in Part 5: Recommended Token Setup. Once you have a few ships ready to play with, we can start discussing how to do ship combat in The Expanse.NOTE: When creating ships for your players, make sure they are in your player journals and can be controlled by your players. To do so, open the character sheet, click the “Edit” button in the top right, then under In Player’s Journals and Can Be Edited & Controlled By, make sure both are set to “All Players.
This is the default Ship Combat map you’ll find in the Samples/ShipCombat folder:
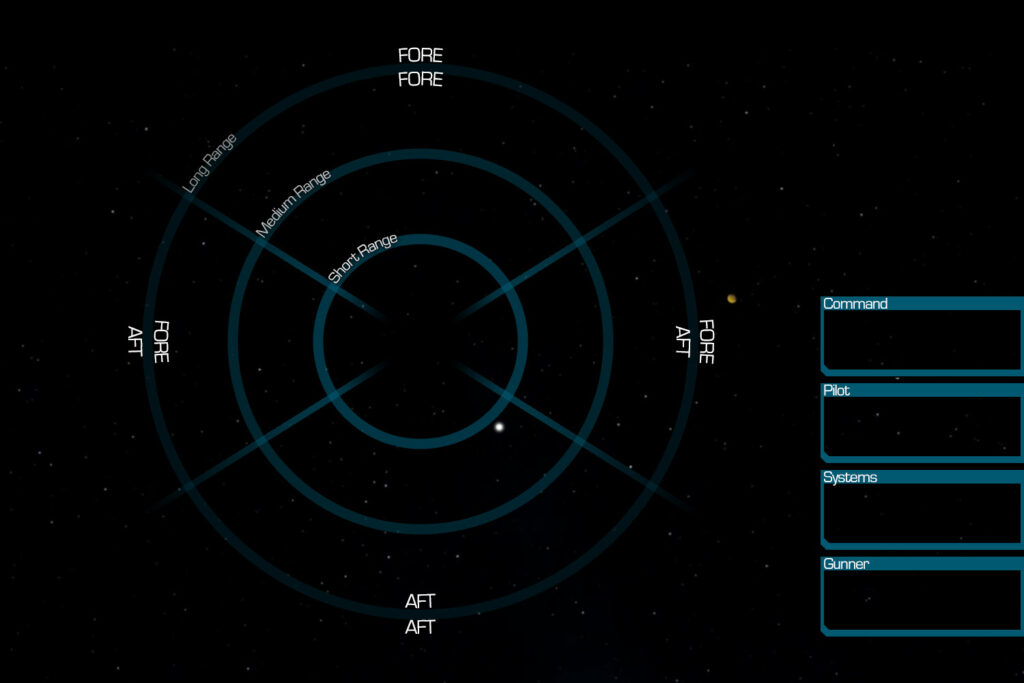
The player ship should always be at the center of the map. Everything is laid out from the player ship’s perspective, so it makes sense for the ship to remain there. Enemy ships will move between range bands and facings as pilots make tests and adjust positioning.
Let’s review what the facings mean one more time.
Space combat follows the basic rules pretty closely, with some tweaks to make everything work on the virtual tabletop. The basic sequence is:
We’ll now dive into each of these steps and play through a sample ship combat scenario along the way.
The first step in each round of space combat is the command test, which generates Stunt Points that the ship’s commander can use to help the crew during this turn. To make a Command Test:
After the roll has been submitted, the result will appear in chat. If the roll was a success, the roll summary will include an “Assign Stunts” button. To assign ship command stunts:
Gameplay example: Edward and his crew are facing off against a UNN destroyer. Edward clicks his Token, then he clicks SCM-Command in the Macro Bar, then he selects his ship, the Queen Mary’s Vengeance, as the target of the Command Test. He rolls a 4, 1, and a 6, and with his Communication score of 3 plus his Leadership Focus bonus of 2 it all adds up to 16: Success! However, since he didn’t roll doubles, the test only generates the minimum of 1SP. Edward chooses to spend 4 Fortune to turn the 1 into a 4, increasing the Churn by 1 but also letting his roll now generate 7SP, which he will assign manually.
To assign ship command stunts manually:
Gameplay example: Edward clicks the Queen Mary’s Vengeance Token, then he clicks SCM-AssignStuntsManually in the Macro Bar. He enters 7 for the SP generated, then he selects the following stunts: Guidance – Piloting (2SP), Blinding Maneuver (2SP), Tactics (2SP), and Guidance – EW (1SP).
Whether you assign stunts manually or via the “Assign Stunts” chat button, you will see a summary in chat about which stunts you selected. Some stunts like Blinding Maneuver and Tactics can create debuffs for opposing ships. If a ship is being targeted by these stunts, the ship needs to receive the debuff after they’ve rolled their own Command Test but before the Piloting Test. To receive such a ship debuff:
Gameplay example: The commander of the UNN ship, the Valley Forge, makes her own Command Test and scores 3SP. She decides to keep those and uses the chat button to select Guidance – Piloting for 3SP, then clicks her ship’s Token and receives both the Queen Mary’s Vengeance’s Blinding Maneuver and Tactics debuffs.
The next step in the ship combat sequence is an opposed Piloting Test. To make the initial test:
Gameplay example: Emboldened by Edward’s guidance, pilot Hiroshi begins his maneuvers. He clicks his Token, then he clicks SCM-Piloting in the Macro Bar, then selects the Queen Mary’s Vengeance as the target of his test since that’s the ship he’s piloting. He hollers out a warning to his crew as he selects a level-1 High-G Maneuver (“Here comes the juice!”), then he enters 1 under Other Modifiers since he has Expertise (Piloting) – Queen Mary’s Vengeance. He rolls a 6, 3, and 5, which together with his Dexterity score of 5 plus Piloting Focus bonus of 2, Guidance Bonus of 2, High-G Maneuver of 1, and Expertise bonus of 1 comes out to a whopping 25. Good luck opposing that!
If a High-G Maneuver was used, the crew must then resist the high acceleration forces. To resist high-g:
Gameplay example: Ronia the Red curses as her crash couch flexes and the Juice flows into her system. She clicks her Token, then clicks the Resist High-G chat button under Hiroshi’s roll summary, then selects Yes (Good) as the ship’s Juice level. Thank the stars they refueled their stores last time they made port, as her roll succeeds and she takes zero damage.
Once the crew has resisted the High-G Maneuver, the opposing ship must answer the piloting roll. To oppose a ship piloting roll:
Gameplay example: UNN Valley Forge’s pilot clicks her token, then she clicks the Oppose chat button. She selects her own ship’s Token as the target of the test, then decides to go all in and selects a level-5 High-G Maneuver. She rolls a 6, 2, and 4, plus her crew’s Competence Rating of 5 (reflected as a Dexterity score of 5), her 3SP guidance bonus, and the level-5 maneuver, plus the -2 size difference penalty (automatically factored in) comes out to 23. So close! Next, she (and the rest of the crew) needs to resist the High-G Maneuver, so she clicks her Token and then the Resist High-G chat button. She fails her resistance roll and takes the full 5d6 acceleration damage, which comes out to 17. She uses 17 points of Fortune to soak the damage, meaning she doesn’t have to take any damage conditions, but with most of her Fortune spent, the rest of this combat will be a challenge.
Following the piloting roll, the winner gets to adjust relative positioning by either 1 range band or 1 facing. If the winner used a High-G Maneuver, they may adjust positioning by 2 range bands, 2 facings, or 1 range band and 1 facing.
Gameplay example: Hiroshi wants to bring Valley Forge into range of Queen Mary’s Vengeance’s rail gun, and he doesn’t want to stay in the UNN destroyer’s favored firing arc, so he asks the GM to move the opposing ship from Long Range – Fore/Fore to Medium Range – Fore/Aft (1 range band and 1 facing), meaning Queen Mary’s Vengeance is “behind” Valley Forge.
Immediately after the Piloting Test, both ships make an opposed Electronic Warfare Test. Do initiate an Electronic Warfare Test:
Gameplay example: Ronia the Red prepares an aggressive EW package to further hamper Valley Forge’s fighting capabilities and hopefully give her own crew an edge. She clicks her own Token, then she clicks SCM-ElectronicWarfare in the Macro Bar, then selects her own ship as the target of her test. The guidance bonus from Edward’s Command Test is factored in automatically, so she leaves the Other Modifiers at 0. She rolls a 1, 4, and 3, plus her Intelligence 5 plus Technology Focus bonus of 2, guidance bonus of 1, and the ship’s Sensor Rating of 4 comes out to 20. Not bad!
Like the Piloting Test, this generates a roll summary in chat which the opposing ship can now use to make their own opposing Electronic Warfare Test. To make the opposing test:
Gameplay example: Valley Forge’s systems officer attempts to use his ship’s own EW suite to bring the hurt on these ruddy pirates. He clicks his Token, then the Oppose chat button, then selects Valley Forge as the target of the test. He rolls a 5, 1, and 3, which plus his Competency Rating of 5 comes out to 14. Normally his ship’s Sensor Rating would have automatically factored into the test, but thanks to Blinding Maneuver his sensors are overwhelmed this turn.
The final outcome summary in chat lists the winner and how many EW Points have been generated.
Gameplay example: 14 is not enough to beat Ronia the Red’s 20, so Queen Mary’s Vengeance will have 2 EW Points to use during the Fire Control step.
Once Command Stunts have been assigned, positioning is resolved, and EW points are generated, it’s time to start shooting. To make ship weapon attacks, the ship’s gunner uses Fire Control to output attack buttons into chat (think of it like creating a firing solution), then makes attacks using these buttons. The winner of the Piloting Test goes first. To initiate Fire Control:
Gameplay example: Without missing a beat, Ibrahim instructs Queen Mary’s Vengeance to provide a firing solution against Valley Forge. The gunner clicks his own ship’s Token, then SCM-FireControl in the Macro Bar, then he selects Valley Forge as the target. The current Engagement Range is Medium, and Valley Forge is in Queen Mary’s Vengeance’s fore arc. In chat, a firing solution appears, showing Ibrahim that his ship’s rail gun and forward-facing torpedo tube are available.
The Fire Control interface in chat lists which weapons (and how many) are available to make attacks. For torpedoes, there will only be a “Fire Weapon” chat button, but rail guns and PDCs will offer both a “Fire Weapon” and a “Targeted Attack” chat button. With these weapons, you can make direct or targeted attacks using either the ship’s sensors or a gunner’s skill.
To make a torpedo attack:
Medium- and long-range torpedoes will be added into the Turn Order (plus a Turn Marker if one isn’t already present). Their attacks will resolve automatically once they close in on their target.
To make a direct rail gun or PDC attack using the ship’s sensors:
To make a targeted rail gun or PDC attack using the ship’s sensors:
If the ship’s gunner has the Gunnery focus, they can make attacks using Gunnery. To make a direct rail gun or PDC attack using Gunnery:
To make a targeted rail gun or PDC attack using Gunnery:
Rail gun attacks, offensive PDC attacks, and short-range torpedoes will create an immediate attack summary in chat which the targeted ship can use to defend against the attack using either evasion or PDCs in case of a torpedo attack, if available.
To defend against an attack using evasion:
To defend against a torpedo attack using the ship’s PDCs:
If either of these tests fail, the ship has to resist damage. This will be covered in the next section.
NOTE: A ship can use BOTH evasion AND any available PDCs to defend against the same torpedo. If one fails, try to use the other.
Gameplay example: Weighing his options, Ibrahim decides to launch a torpedo first, so he clicks the Fire Weapon chat button for the ship’s torpedo tube once. This adds one torpedo to the Turn Tracker, indicating that the torpedo will close in on Valley Forge in 1 turn, so this attack will be resolved at the end of the next turn. Next, he decides to try to take out Valley Forge’s reactor to prevent the ship from making any more High-G Maneuvers. He clicks his own Token, then he clicks the Targeted Attack chat button for Queen Mary’s Vengeance’s rail gun. He selects Gunnery as the Attack Type, then he selects Reactor as the targeted system. Ibrahim rolls a 5, 4, and a 5, plus his Accuracy ability score of 3, the Gunnery Focus bonus of 2, the ship’s Sensor Rating of 4, plus the 2 EW Points used for the attack, his roll total is 25.
Valley Forge’s pilot attempts to dodge the attack and clicks her own Token, then she selects Valley Forge as the target of the Evasion Test. Desperate to avoid a Reactor hit, she goes for another level-5 High-G Maneuver. She rolls a 2, 4, and a 2, plus her Competency Rating of 5, plus the level-5 High-G Maneuver comes out to 18. A good roll, but not enough to beat Ibrahim’s gunnery. Valley Forge now needs to resist damage to see if her reactor remains operational. Oh yeah, and the crew must also resist another High-G Maneuver’s acceleration damage.
When a ship fails a defense roll, the roll summary will include a “Resolve Damage” chat button. To resolve ship damage:
This will output a soak roll summary in chat, listing damage and any resulting ship losses.
Gameplay example: Valley Forge’s commander clicks her ship’s Token, then she clicks the Resolve Damage chat button in the targeted rail gun attack summary. The incoming damage roll for the rail gun was a 3, 5, and a 1, for 9 total damage. Valley Forge uses its hull rating to resist damage, rolling a 4, 6, and a 6, plus its +1 bonus from Hull Plating, for a total of 17. Since this is a targeted attack, the resistance roll is halved to 8; not enough to overcome 9 damage. Valley Forge suffers a targeted Reactor loss, and the commander dispatches engineering teams to bring the reactor back online.
After all direct/targeted attacks have been carried out and damage has been resolved (and characters have made their damage control rolls, if necessary), the GM advances the Turn Tracker until the Turn Marker increases by 1. Medium- and long-range torpedo attacks are resolved during this step, as these weapons close in at the end of a turn.
Gameplay example: It’s the end of turn 2, and all the medium-range torpedoes launched during the first turn are closing in: one from Queen Mary’s Vengeance to Valley Forge, three from Valley Forge to Queen Mary’s Vengeance. As the GM advances the Turn Tracker and torpedoes reach their targets, a new attack summary is posted in chat for each torpedo, and each attack needs to be resolved before the next turn can begin.
By now, you should have a basic understanding of how to get the game hooked up in Roll20, including all the macros and other fiddly bits that need doing before you can start rolling dice. Alright, sweet; now how do you actually play this darn thing?
I don’t want to give a primer on how to run a campaign as a GM here. The core rulebook does a fantastic job explaining that part, and if you want to go deep there are a multitude of amazing content creators on YouTube and elsewhere who are extremely generous with sharing their accrued experience of what it takes to be a good GM. Instead, I’d like to take a moment to give some practical tips on how to run a game that’s laid back, fun, and doesn’t kill the GM with prep work.
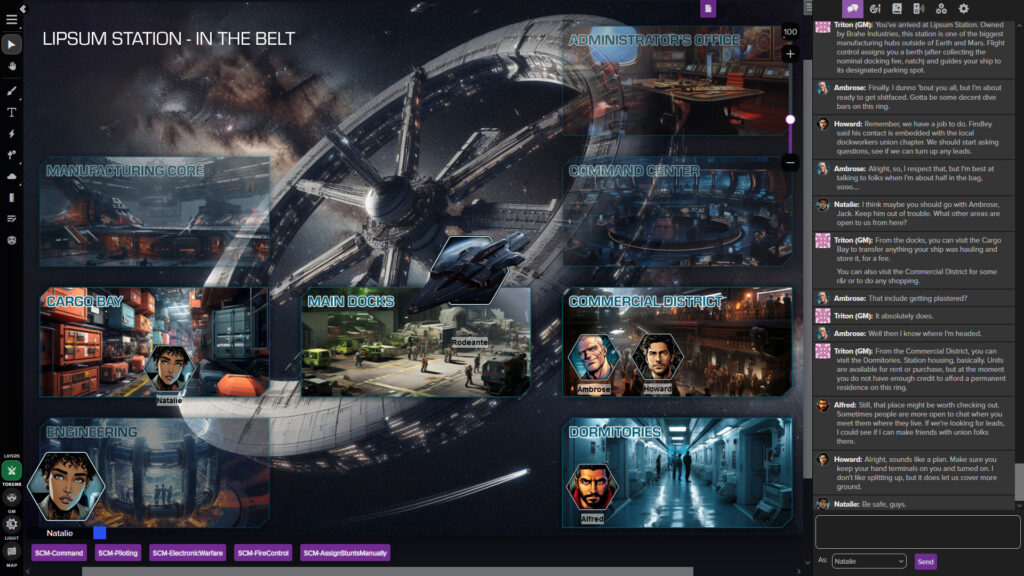
Everything in a campaign happens somewhere. As the GM, you have the story and setting in your head, but players often need help getting situated. A well-defined place hierarchy helps players find their footing and plot their own course through the world you provide for them. In practice, this looks something like this:
A map of the current solar system makes for a great splash screen to show at the beginning of your session. The core rulebook includes a fantastic map of the solar system including most major locations, but there is an ocean of other solar system maps on the internet that you can customize for your own needs.
When combat happens, you generally want to transition to a Combat Encounter, which would ideally be its own Page. There are space combat and ground combat encounters; space combat encounters should use the tactical grid map provided in this project’s assets package.A special Page that may exist somewhat outside of the place hierarchy is Home Base. Depending on your campaign, your players may have their own ship, or a main office on a space station, or some other place they call home. Transition to this Page whenever the players are back and taking a breather or if there’s an Interlude.
Gameplay example: In a recent campaign, the GM set up the following Pages in Roll20 for his players to explore:
See the screenshot at the end of Part 4 for an example of this principle in action.
When creating hostile (or allied) NPC spaceships, you can create individual NPCs for each crew role in addition to the ship itself, but a more efficient way is to first enter Ability scores, Focuses, and Character Level as though this were a regular NPC, then switch to the ship sheet and fill out the rest of the stats, then treat the Token for this ship as both the ship AND its crew. For example, to make a Command Test for an NPC spaceship set up this way, you would click the NPC ship Token, then the “SCM-Command” button in the Macro Bar, then the NPC ship Token again.
One quirk of this game’s setup is that each Token is meant to represent a unique character. In practice, that means if you have for example a Security Guard NPC already set up, and you want to have three guards securing a checkpoint, you can’t just drag the Security Guard from
the Journal onto the Page three times because each of these tokens will be linked to the Security Guard’s character sheet.
This creates a bit of a hassle because if you have a group of NPCs, you’ll need to create a sheet for each of them (or duplicate characters by opening their character sheet, clicking “Edit,” then clicking “Duplicate”). As a tradeoff, requiring each NPC to be unique (or to at least have their own sheet) at least offers a consistent way to make each character unique and keep your players on their toes. In the example above, it’d be easy to make one security guard the loose cannon with low Willpower but high Dexterity, one guard the slow brawler with low Dexterity but high Fighting and Stamina, etc.
Thanks to the Roll20 team and their awesome community for providing documentation, feedback, support, and inspiration to their developers.
Major props to the team at Green Ronin for creating one of my favorite scifi RPG systems.
Spaceship deckplan created using Dungeondraft by Megasploot.
The vast majority of Dungeondraft assets used were created by The Planet Hoppers.